


49
Alrighty! My first tutorial on this site :D
I will update frequently for each body part, hopefully one part each week, but for now only the head tutorial is finished ^^
I'll be using PMCSkin3D for this tutorial even though I’ve never used it before because the app I use to make skins has a very unique color picker menu 🤔
I hope you find this tutorial helpful! And remember, everyone has their own shading style. That means you don’t have to follow the exact shading used here!
Once the skin is finished, I’ll post it on my main account and link it back and forth, so there will be a link here to the skin and from the skin to here, if that makes any sense lol
And this will be where I end it! Since the app I use has a special color picking menu, which looks like this, I might make a version of these tutorials using that if you guys would like it, y’know, just in case you guys use something with a similar menu xD
So if you’d like a version with that menu, just comment below and tell me.
I will update frequently for each body part, hopefully one part each week, but for now only the head tutorial is finished ^^
I'll be using PMCSkin3D for this tutorial even though I’ve never used it before because the app I use to make skins has a very unique color picker menu 🤔
I hope you find this tutorial helpful! And remember, everyone has their own shading style. That means you don’t have to follow the exact shading used here!
Hue Shifting Tips & Tricks
Some hue shifting tips for beginners! The palettes I will be making in this section will be all put in one skin available to download at the very end for those who would like to use them :>
Colors to hue shift into
1. Start with your base color. I’m going to take one of every main color in the color wheel and make a palette for that as an example.
![[Jyuunen] Skin Tutorial - Hue Shifting, Shading, & More!](https://img00.deviantart.net/8fdb/i/2018/302/8/5/6fa161f0_856e_4648_bee5_250d31503105_by_tsuk1akari-dcqoyfe.jpg)
2. Now we do the darker shades. For the red, I will reccomend hue shifting into purple, orange to red, yellow to orange, green to blue, cyan to darker blue, blue to purple, purple to blue, and pink to purple.
![[Jyuunen] Skin Tutorial - Hue Shifting, Shading, & More!](https://img00.deviantart.net/590d/i/2018/302/b/3/50baff3c_b057_478d_9a87_aa310a74ae14_by_tsuk1akari-dcqoyf3.jpg)
4. Now we do the lighter shades. I’ll be doing three so it’s usuable for six-swatch color palettes like my hair shading. For red, I reccomend orange, orange to yellow, yellow to white basically, green to yellow, cyan to green, blue to cyan/green, purple to pink, and pink to pale red.
![[Jyuunen] Skin Tutorial - Hue Shifting, Shading, & More!](https://img00.deviantart.net/55fe/i/2018/302/1/4/16ecfbaf_e9e0_4419_85f0_f8cdae7a58be_by_tsuk1akari-dcqoyet.jpg)
Special Cases
Sometimes there are special cases of hue shifting. For example, hue shifting yellow into purple. Here I have an example of a pale yellow shifting into a dull purple as well as a dull orange shifting into a warm purple.

There are also other cases such as pink with yellow as the highlights. Here I have an example of a pink palette shifting into yellow and a bright yellow shifting into a mellow purple.

Now remember there are colors like brown, black, and white. For brown, I would reccomend hue shifting into a deep red like mahagony, or a deep purple. As for black and white, just hue shift into the color that works best with the skin's main color palette. Try not to go too much into grey territory unless if you’re making a black and white skin. For greys, try making the base color not pure grey but have a little blue or purple in it. This usually makes it warmer and more "colorful".
Skin with the shown color palettes.

right click > save as (desktop)
tap and hold > save image (mobile, or at least on apple products)
Colors to hue shift into
1. Start with your base color. I’m going to take one of every main color in the color wheel and make a palette for that as an example.
2. Now we do the darker shades. For the red, I will reccomend hue shifting into purple, orange to red, yellow to orange, green to blue, cyan to darker blue, blue to purple, purple to blue, and pink to purple.
4. Now we do the lighter shades. I’ll be doing three so it’s usuable for six-swatch color palettes like my hair shading. For red, I reccomend orange, orange to yellow, yellow to white basically, green to yellow, cyan to green, blue to cyan/green, purple to pink, and pink to pale red.
Special Cases
Sometimes there are special cases of hue shifting. For example, hue shifting yellow into purple. Here I have an example of a pale yellow shifting into a dull purple as well as a dull orange shifting into a warm purple.
There are also other cases such as pink with yellow as the highlights. Here I have an example of a pink palette shifting into yellow and a bright yellow shifting into a mellow purple.
Now remember there are colors like brown, black, and white. For brown, I would reccomend hue shifting into a deep red like mahagony, or a deep purple. As for black and white, just hue shift into the color that works best with the skin's main color palette. Try not to go too much into grey territory unless if you’re making a black and white skin. For greys, try making the base color not pure grey but have a little blue or purple in it. This usually makes it warmer and more "colorful".
Skin with the shown color palettes.
right click > save as (desktop)
tap and hold > save image (mobile, or at least on apple products)
1. Head
This is the tutorial for the head, which is the part I usually start off with.
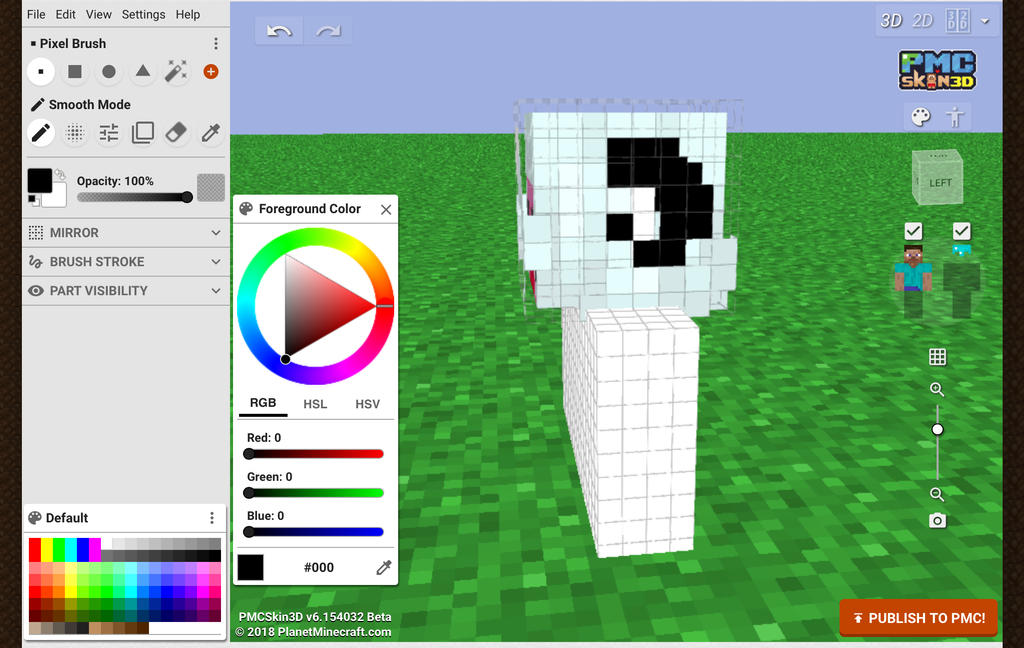
1. Make it so that it shows only the head (duh) and bring up the color picker. It should look something like this, and you might want to zoom in and angle it a bit.

2. Select the color you want for the highlight. I’ll be doing a red skinned-demon so I started off with the bright, saturated red.

3. Select the base color. This is where the hue shifting starts. From where you had selected the highlight, move the hue slider (on the circular ring) up or down a bit. For this color, I moved it down. Then, you move the saturation/brightness... circle (on the triangle in the middle) across towards the black side. A little easier to explain if you compare this pic to the previous one lol.

4. Do the first shade. Use the same technique as step 3. Start moving towards the middle as well.

5. And lastly, for the skin, the darkest shade. Apply the same technique as step 4.

6. Color in the bottom of the head, and I usually wrap the pixels around the edge.

7. Start the eyes, and since I’m doing "black" eyes I started from the eyelashes. Those should be the darkest part of the eye palette.

8. Now to the shade of the pupils. Pick the color you want to hue shift to on the slider, and then move up on the edge of the triangle as shown. For other colors, follow the hue shifting tips and tricks tab. For the eyes, the distance you move the slider and circle would be almost twice as far as you would for the rest of the palettes.

9. Follow the same technique as step 8 for the base color of the pupils.

10. For the scleras, you do a similar technique as the pupils but much less saturated. Also, this is a personal choice though, make sure the "white" isn’t actually white, or HEX code #FFFFFF.

11. Now we move onto the hair palette. My shading uses six total swatches, but depending on your shading style the amount may vary. I would reccomend at least four swatches though. Since I’m doing white hair, I would use only five swatches. You select the color you want to hue shift into, of which I chose ice blue, and then slowly hue shift into it by lowering the brightness and slowly putting more saturation.

12. Now you will start with the darkest shade, and color in the darker parts of the hair. Most of the bottom face will be this color as it is, well, the part that gets the least light. The top face will depend on one’s shading, as I usually include a hairline.


13. Now we use the second darkest shade and shade in around the darkest shade that you put in step 12.


14. Now we use the "base" color and fill in the bits where there won’t be any highlights. Remember that the placement of the pixels all depend on your shading style :D


15. Now we do the overlay of the hair. The back parts are not necessary but that’s my style. As for the bangs, those are important. You don’t have to follow the exact placement, but this is usually how I shade the bangs. For the back overlay I just follow the base.


16. And now, since this is a demon, the horns! I will be doing ram horns for this one. We start with the base layer and the starting point of the horns. Since these will be black, I start with black.

17. Now to the overlay, which connects the start of the horns and ends it.
18. Now we start shading. Using the same hue shifting technique as the eyes but with less distance, I made four more swatches. Applying the darker ones to the base layer and the lighter ones to the overlay, it will give the horns more 3Dness.


And we're done! Thank you for reading all the way to the end and I sincerely hope this has helped you in any way, shape or form ^^
1. Make it so that it shows only the head (duh) and bring up the color picker. It should look something like this, and you might want to zoom in and angle it a bit.
2. Select the color you want for the highlight. I’ll be doing a red skinned-demon so I started off with the bright, saturated red.
3. Select the base color. This is where the hue shifting starts. From where you had selected the highlight, move the hue slider (on the circular ring) up or down a bit. For this color, I moved it down. Then, you move the saturation/brightness... circle (on the triangle in the middle) across towards the black side. A little easier to explain if you compare this pic to the previous one lol.
4. Do the first shade. Use the same technique as step 3. Start moving towards the middle as well.
5. And lastly, for the skin, the darkest shade. Apply the same technique as step 4.
6. Color in the bottom of the head, and I usually wrap the pixels around the edge.
7. Start the eyes, and since I’m doing "black" eyes I started from the eyelashes. Those should be the darkest part of the eye palette.
8. Now to the shade of the pupils. Pick the color you want to hue shift to on the slider, and then move up on the edge of the triangle as shown. For other colors, follow the hue shifting tips and tricks tab. For the eyes, the distance you move the slider and circle would be almost twice as far as you would for the rest of the palettes.
9. Follow the same technique as step 8 for the base color of the pupils.
10. For the scleras, you do a similar technique as the pupils but much less saturated. Also, this is a personal choice though, make sure the "white" isn’t actually white, or HEX code #FFFFFF.
11. Now we move onto the hair palette. My shading uses six total swatches, but depending on your shading style the amount may vary. I would reccomend at least four swatches though. Since I’m doing white hair, I would use only five swatches. You select the color you want to hue shift into, of which I chose ice blue, and then slowly hue shift into it by lowering the brightness and slowly putting more saturation.
12. Now you will start with the darkest shade, and color in the darker parts of the hair. Most of the bottom face will be this color as it is, well, the part that gets the least light. The top face will depend on one’s shading, as I usually include a hairline.
13. Now we use the second darkest shade and shade in around the darkest shade that you put in step 12.
14. Now we use the "base" color and fill in the bits where there won’t be any highlights. Remember that the placement of the pixels all depend on your shading style :D
15. Now we do the overlay of the hair. The back parts are not necessary but that’s my style. As for the bangs, those are important. You don’t have to follow the exact placement, but this is usually how I shade the bangs. For the back overlay I just follow the base.
16. And now, since this is a demon, the horns! I will be doing ram horns for this one. We start with the base layer and the starting point of the horns. Since these will be black, I start with black.
17. Now to the overlay, which connects the start of the horns and ends it.
18. Now we start shading. Using the same hue shifting technique as the eyes but with less distance, I made four more swatches. Applying the darker ones to the base layer and the lighter ones to the overlay, it will give the horns more 3Dness.
And we're done! Thank you for reading all the way to the end and I sincerely hope this has helped you in any way, shape or form ^^
2. Torso
Since sometimes you have long hair going down the torso, I usually do this part second. Now from here on out, the order of things will be a bit wonky but it stays mostly to that body part :3
(Coming Soon)
(Coming Soon)
3. Arms
I don’t really have a preferred part to do after the torso, but I’ll just put the arms first.
(Coming Soon)
(Coming Soon)
4. Legs
And finally, legs! This should fill the rest of the skin :D
(Coming Soon)
(Coming Soon)
Special Accessories
This will be where I will do mini tutorials on special accessories like flowers and glasses :D
If you have anything you’d like me to do a mini tutorial on, as I will not have covered everything possible to skin, just comment and I’ll reply ASAP to say if I will do it or not ^^
(More Coming Soon)
Requested Mini-Tutorials
(none yet :p)
If you have anything you’d like me to do a mini tutorial on, as I will not have covered everything possible to skin, just comment and I’ll reply ASAP to say if I will do it or not ^^
Flower (+ rose)
This is how I usually do flowers. I'll be doing a grey flower because why not.
1. Get your two darker shades and apply them to the skin like this. The lighter part faces the side where your light source will be.

2. Get your base color and your highlight and apply them to the overlay like so. The highlight should be the two pixels on top of the lighter dark color.

3. Take a color, it can be darker or light, doesn’t matter, and apply it to the base layer in the middle.

4. Leaves! Take a base color and apply them to the edges of the flower you just made. These are some examples of ways you could apply the color. Make sure to use the overlay a few times here and there as well!

5. Take a darker shade of the base color and apply them to the areas of the leaves that falls under the "shadow" of the flower.

For roses, you do the same thing with the leaves and the rose itself doesn’t need an overlay part and only needs three swatches. Here's an example.

Relatively simple! If you have any questions on any kind of flower, just ask ^^
1. Get your two darker shades and apply them to the skin like this. The lighter part faces the side where your light source will be.
2. Get your base color and your highlight and apply them to the overlay like so. The highlight should be the two pixels on top of the lighter dark color.
3. Take a color, it can be darker or light, doesn’t matter, and apply it to the base layer in the middle.
4. Leaves! Take a base color and apply them to the edges of the flower you just made. These are some examples of ways you could apply the color. Make sure to use the overlay a few times here and there as well!
5. Take a darker shade of the base color and apply them to the areas of the leaves that falls under the "shadow" of the flower.
For roses, you do the same thing with the leaves and the rose itself doesn’t need an overlay part and only needs three swatches. Here's an example.
Relatively simple! If you have any questions on any kind of flower, just ask ^^
(More Coming Soon)
Requested Mini-Tutorials
(none yet :p)
Once the skin is finished, I’ll post it on my main account and link it back and forth, so there will be a link here to the skin and from the skin to here, if that makes any sense lol
And this will be where I end it! Since the app I use has a special color picking menu, which looks like this, I might make a version of these tutorials using that if you guys would like it, y’know, just in case you guys use something with a similar menu xD
So if you’d like a version with that menu, just comment below and tell me.
| Tags |
tools/tracking
4214257
6
jyuunen-skin-tutorial-hue-shifting-shading-amp-more

![[Jyuunen] Skin Tutorial - Hue Shifting, Shading, & More! Minecraft Blog](https://static.planetminecraft.com/files/resource_media/screenshot/1843/8a9d2e3c-97ef-4dbf-a8bc-2170344c940f-1540783058_thumb.jpg)
![[Jyuunen] ChronoPulse || Incomplete Minecraft Blog](https://static.planetminecraft.com/files/resource_media/screenshot/1904/efd84dfb-38d3-47f2-a8eb-0837df60e71a-1548130632_thumb.jpg)


 mega7
mega7 Riseabove089
 BlissyMissy
 KaiOceansword
 CrystalRuby
 ScotsMiser
 Molitoola


 illystray

 pathisgamer
Create an account or sign in to comment.