


667
Hey! today i will show you how to make an awesome render of your minecraft world.
In this tutorial I will concentrate on maps of islands, but this will also work for buildings and other maps.
Step 1: get the right programs. ( I will only use free programs. )
1. Chunky: this is the program where we will make the render. You
can download it here: http://chunky.llbit.se/
2. Gimp: this is an image manipulation program. We will use it to make the fine tuning of our picture. You
can download it here: http://www.gimp.org/ ( as an alternative you can use photoshop for this, but I
will only show with gimp )
Step 2: information you require to start:
1. How much RAM (internal memory ) do you have ? You need to know that because chunky wants to know
how much of it can be used to render the picture. ( if you don’t know how to find out how much ram your
pc has, click this here
2. Find out the water level of your minecraft world.
Step 3: open chunky
1. you should now see this.

2. Make sure the minecraft directory is correct,
3. choose your memory limit. Important: use only a maximum of 75 % of your computer’s ram. If you ignore
this, chunky or your pc may crash. [ if you have 4gb ram use a memory-limit of 3000, if you have 16gb
use 12000. my computer has 32 gb ram. So I can use the maximum of the programe. ( the more ram
you have the faster the render works ) ]
Step 4: load any resource pack

1. to load a resourcepack go to options and click on load resourcepack. Now you can choose
the resourcepack you want to have from your resourcepack folder.
Step 5: select world
1. just click on the ‘select world’ button and choose the world you want.

Step 6: select the region
1. zoom out so that you can see the whole world [mouse scroll button]
2. now you can make a red box by pressing L-shift and dragging
. while pressing left click. Every red marked chunk is a region you will later see on the render.
Every de-selected chunk will be air in your render. Because of this I would recommend to
select the whole world.

3. Important if you have a computer with only 4 GB RAM- you will have problems if you select a
bigger region then 1500 x 1500 blocks. With more then 20 gb ram you can render pictures
without problems up to world sizes of 4k to 5k ( maybe even bigger I never tried that )
4. when you have selected all chunks you want, make a right click in the selected area. in the small
window with pop up click on “new 3D scene ...“

5. at the bottom of this window you can see the progress of the chunks loading. Wait until a
new window pops up. ( if the loading freeze for more then 1 min your selected area was to
big for your computer. ( if this happens go back to step 6.2 )
Step 7: find a good camera position for your render
1. go to the > tab general settings and set canvas size to 960x540
2. click in the render preview window and fly out with mouse and WASD, until you found a good
position. Its good if you have some pictures where you can see the whole islands and some
pictures where you can see the details of a island. The first picture is for a overview picture.
In the second picture you see a position for a more detailed view.
3. I will now go on with the second type of perspective.


Step 8: water settings ( if you render a terrain without water or a building skip this step
1. go to the tab “water” and enable the water world setting. Set the water height to the same water
level of your Minecraft world. And press apply after that. ( depending on the size of your world and
the quality of your PC, chunky may freeze for up to 40 min. it is still working in the background, so
just wait and keep calm until its done. )
2. ( optional ) enable “still water” if you want that the water reflect very well. If you don't want this,
disable it

Step 9: edit lighting
1. open the tab “lighting” and press “start” in the bottom of the window.
Now you can edit the direction where the sun is located with the “sun azimuth” adjuster,
and the height of the sun with the “sun altitude” adjuster
2. I would also recommend to make the intensity a bit higher
( just try around with these settings to find the perfect position and intensity of the sun )
3. press the reset button

Step 10: add a sky
1. search for a free picture of a sky with a high resolution and download it . a good website for
that is : http://www.texturex.com/Sky-Textures/
2. go to the tab “sky”
3. select Sky Mode : skymap ( panoramic )
4. now click on load skymap. And select the picture you downloaded at 10.1
5. now you need to rotate your sky so that it fits to the lighting you made before. ( not every sky
fits to every light situation. So you may need to flip your sky picture or download some
more pictures.
6. Disable all other options below

Step 11: set final resolution.
1. Go back to general settings tab
2. make the canvas size to 1920x 1080 ( if you have a bad computer you may skip this step
to save some time )
3. and as last thing press start and wait until its finished.
4. When its finished press ‘save current frame’ and save it to a place where you will find it later.

Step 12: fine tuning.
1. Open the picture in gimp.
2. Now click on “colours” in the top bar. And then click on “Brightness and Contrast”. The
pictures will look nicer if you edit the contrast to a higher value. You will see if it is too much . If
your picture is too dark also edit the brightness. If you are satisfied click on ‘OK’


3. go again to colors and now click on Hue-Saturation. Here you should make saturation to a
higher value. ( But do not overdo it ). if you want you can also edit the hue. Sometimes this
looks good but most of the time it get a very unrealistic feeling. And as last you check again
if the brightness still is optimal, if not edit the lighting.

4. ( optional ) if the sun is in your picture or would be if you move around like 10 % you can add a
lens flair. To do that click on filters in your top bar. Then click on light and shadow. Now select
“lens Flair”. In the window you need to drag the hair cross to the place where your sun is. Or the
nearest point to the sun in your picture.

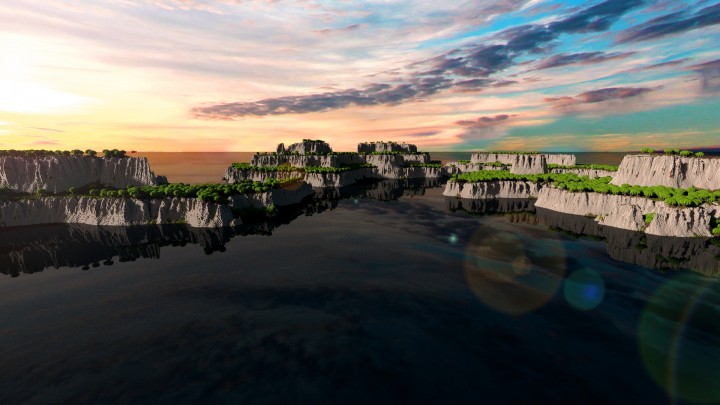
This is my final picture :

I hope you liked my tutorial and have made a very nice render. If you think some point is not well explained, please write a comment or a personal message. And I will try to fix the as fast as possible.
Would be cool if you make a link to your pictures in the comments
| Tags |
3111694
6


 Howardeez69
 RangerRicochet
 DoomStryker
 ExtremeGames
 prosodic
 HudSolo2009
 EnderShameimaru
 Meat_Mallet
 ScotsMiser

 MaximusPrime23
 Markus_INC
Create an account or sign in to comment.
iam happy that you found a solution