


- 7,309 views, 1 today
- 660 downloads, 0 today

770
"Next, keep firing!
Gun ready! Fire!"
-Stonehenge Crewman
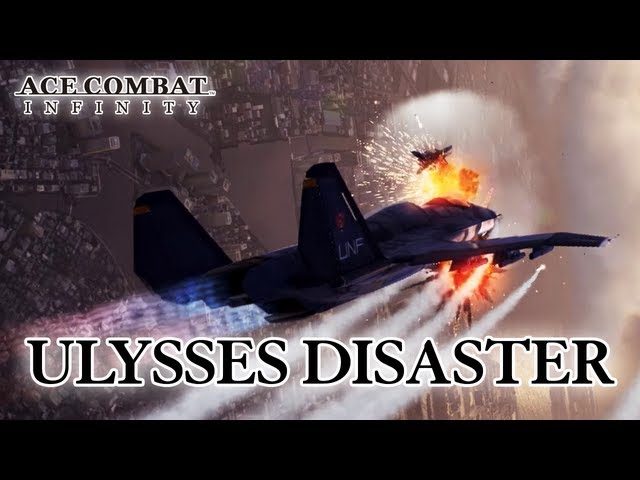
The Stonehenge Turret Network, frequently known in shorthand as Stonehenge, was a planetary defense complex created by the Federation of Central Usea in western Usea. It was one of the primary weapons developed at the end of the 20th century to engage the 1994XF04 Ulysses asteroid, and the catalyst of the Usean Continental War in 2003 after its capture by Erusea.
"It will be 20 years to the day soon, I think this calls for a little history lesson."
-Gamer
After the discovery of Ulysses in late 1994 and the determination of its trajectory, the news of the impending impact were kept in secrecy until April 20 of 1996, when FCU president Robert Sinclair revealed the existence of the asteroid to the world in a public conference. That same day, a second conference was held at the Usea Treaty Organization by Secretary of State Stetson, where various defensive projects were proposed, including the creation of a "National Missile Defense" system in UTO member nations.
The Stonehenge complex, internally known as Project STN (Spaceguard Turret Network), was later conceived by the FCU under the Defense Initiative plan, with construction taking place in Area 26021-3, a site in the desert south of San Salvacion. The development of the complex was overseen by the Project STN Committee, while security was provided by armed troops and a fighter squadron of the UTO, whose roster included Usean Rebellion veteran John Herbert.
Numerous corporations and scientists from across the world were involved; at least one Belkan, David Hartmann, was known to have been involved. Osea and Yuktobania intially considered joining the project, but declined on account of post-Belkan War reconstruction efforts. The main site was completed in June 1998, while the rest of the complex remained under construction in the later months.
In that same month, the release of an updated report of Ulysses' predicted impact areas by the International Astronomical Union birthed protests in Anea against the FCU over their lack of protection against the asteroid. However, it had passed a point where further revisions to Stonehenge could be made.
On July 3 of 1999, Stonehenge went online and commenced operations against Ulysses, succeeding in limiting damage across Usea during the planetfall event. Although it was one of the most successful weapons of its type during the disaster, a single railgun was knocked out by a meteorite impact, and remained useless for the rest of its existence.
In the aftermath of Ulysses Day, Erusea began to receive an excessive amount of refugees, leading to tensions with the international community. The Erusean military invaded San Salvacion in the summer of 2003 and captured Stonehenge, using it to attack other Usean territories. In an official announcement, it declared that ground patrols and staff were kept "under protection" by its troops. Similarly, twelve UTO aircraft disappeared during the incident.

<<STONEHENGE RETURNS>>
"Stonehenge Destruction Mission"
The surface-to-air railgun, "Stonehenge", has started functioning again. Its massive destruction power is causing serious damage to our forces. We need you to head to Turkey immediately and destroy Stonehenge. The enemy will be jamming the surrounding airspacevia facilities on the ground, making it impossible for you to cause damage to Stonehenge until they are destroyed. The purpose of this mission is to completely destroy these facilities and the surface-to-air railgun
STONEHENGE RETURNS I
Players spawn at the southeast corner of the map. Stonehenge is located roughly in the center of the map, and will immediately commence firing on all players. All eight railguns are active, and Stonehenge's fire now blankets the sky at all altitudes within the damage range, forcing players to avoid the blast radius completely. Radar jamming facilities consisting of three radar towers defended by multiple AA guns and SAMs are set up in four locations, one on each corner of the map. The players' first objective is to destroy the radar towers to clear the jamming. Soon afterward, five MiG-31 Foxhounds will enter the airspace from the northwest. Players must shoot down all five of these aircraft. After all aircraft are shot down, the three jamming towers in the middle of Stonehenge can be damaged. All three towers must be destroyed to continue with the mission. Finally, players must destroy all eight Stonehenge railguns to complete the mission.
STONEHENGE RETURNS II
As with STONEHENGE RETURNS I, players start off at south-east of Stonehenge and must first destroy the four groups of three ECM jammer towers surounding the railguns. They will be under attack by Stonehenge Red Ring's railguns, whose firing rate is greater than that of the normal variant. Upon destruction of the ECM facilities, MiG-31 Foxhounds will appear, which must be shot down before the three ECM jammers towers inside Stonehenge can be targeted. Once the jammers are destroyed, the railguns can then be targeted and destroyed to complete the objective.
STONEHENGE RETURNS III
As with STONEHENGE RETURNS I and II, players start off at south-east of Stonehenge and must first destroy the four groups of three ECM jammer towers surounding the railguns. They will be under attack by Stonehenge Gold Ring's railguns, whose firing rate is even greater than that of the other two variants. A group of T-50 PAK-FA will appear in place of the MiG-31 Foxhound as reinforcement, followed by three P-1113 Kottos aerial warships providing further jamming before the three ECM jammers towers inside Stonehenge can be targeted. Once the jammers are destroyed, the railguns can then be targeted and destroyed to complete the objective.
STONEHENGE RETURNS IV
Players spawn at the southeast corner of the map. Stonehenge is located roughly in the center of the map, and will immediately commence firing on all players. All eight railguns are active, and Stonehenge's fire now blankets the sky at all altitudes within the damage range, forcing players to avoid the blast radius completely. Radar jamming facilities consisting of three radar towers defended by multiple AA guns and SAMs are set up in four locations, one on each corner of the map. The players' first objective is to destroy the radar towers to clear the jamming. Soon afterward, three Kottos-class aerial warships will spawn above Stonehenge, jamming the radar. Players must shoot all three of them down, by first destroying their jammer arrays, then their engines, and finally their cockpits. After all three Kottos are shot down, one of Camilla's QFA-44 Carmillas will appear alongside innumerable MQ-90Ls. Her QFA-44 is the only important target here, and must be shot down to continue the mission. After the QFA-44 is shot down, the three jamming towers in the middle of Stonehenge can be damaged. All three towers must be destroyed to continue with the mission. Finally, players must destroy all eight Stonehenge railguns to complete the mission.
Gun ready! Fire!"
-Stonehenge Crewman
The Stonehenge Turret Network, frequently known in shorthand as Stonehenge, was a planetary defense complex created by the Federation of Central Usea in western Usea. It was one of the primary weapons developed at the end of the 20th century to engage the 1994XF04 Ulysses asteroid, and the catalyst of the Usean Continental War in 2003 after its capture by Erusea.
"It will be 20 years to the day soon, I think this calls for a little history lesson."
-Gamer
After the discovery of Ulysses in late 1994 and the determination of its trajectory, the news of the impending impact were kept in secrecy until April 20 of 1996, when FCU president Robert Sinclair revealed the existence of the asteroid to the world in a public conference. That same day, a second conference was held at the Usea Treaty Organization by Secretary of State Stetson, where various defensive projects were proposed, including the creation of a "National Missile Defense" system in UTO member nations.
The Stonehenge complex, internally known as Project STN (Spaceguard Turret Network), was later conceived by the FCU under the Defense Initiative plan, with construction taking place in Area 26021-3, a site in the desert south of San Salvacion. The development of the complex was overseen by the Project STN Committee, while security was provided by armed troops and a fighter squadron of the UTO, whose roster included Usean Rebellion veteran John Herbert.
Numerous corporations and scientists from across the world were involved; at least one Belkan, David Hartmann, was known to have been involved. Osea and Yuktobania intially considered joining the project, but declined on account of post-Belkan War reconstruction efforts. The main site was completed in June 1998, while the rest of the complex remained under construction in the later months.
In that same month, the release of an updated report of Ulysses' predicted impact areas by the International Astronomical Union birthed protests in Anea against the FCU over their lack of protection against the asteroid. However, it had passed a point where further revisions to Stonehenge could be made.
On July 3 of 1999, Stonehenge went online and commenced operations against Ulysses, succeeding in limiting damage across Usea during the planetfall event. Although it was one of the most successful weapons of its type during the disaster, a single railgun was knocked out by a meteorite impact, and remained useless for the rest of its existence.
In the aftermath of Ulysses Day, Erusea began to receive an excessive amount of refugees, leading to tensions with the international community. The Erusean military invaded San Salvacion in the summer of 2003 and captured Stonehenge, using it to attack other Usean territories. In an official announcement, it declared that ground patrols and staff were kept "under protection" by its troops. Similarly, twelve UTO aircraft disappeared during the incident.
<<STONEHENGE RETURNS>>
"Stonehenge Destruction Mission"
The surface-to-air railgun, "Stonehenge", has started functioning again. Its massive destruction power is causing serious damage to our forces. We need you to head to Turkey immediately and destroy Stonehenge. The enemy will be jamming the surrounding airspacevia facilities on the ground, making it impossible for you to cause damage to Stonehenge until they are destroyed. The purpose of this mission is to completely destroy these facilities and the surface-to-air railgun
STONEHENGE RETURNS I
Players spawn at the southeast corner of the map. Stonehenge is located roughly in the center of the map, and will immediately commence firing on all players. All eight railguns are active, and Stonehenge's fire now blankets the sky at all altitudes within the damage range, forcing players to avoid the blast radius completely. Radar jamming facilities consisting of three radar towers defended by multiple AA guns and SAMs are set up in four locations, one on each corner of the map. The players' first objective is to destroy the radar towers to clear the jamming. Soon afterward, five MiG-31 Foxhounds will enter the airspace from the northwest. Players must shoot down all five of these aircraft. After all aircraft are shot down, the three jamming towers in the middle of Stonehenge can be damaged. All three towers must be destroyed to continue with the mission. Finally, players must destroy all eight Stonehenge railguns to complete the mission.
STONEHENGE RETURNS II
As with STONEHENGE RETURNS I, players start off at south-east of Stonehenge and must first destroy the four groups of three ECM jammer towers surounding the railguns. They will be under attack by Stonehenge Red Ring's railguns, whose firing rate is greater than that of the normal variant. Upon destruction of the ECM facilities, MiG-31 Foxhounds will appear, which must be shot down before the three ECM jammers towers inside Stonehenge can be targeted. Once the jammers are destroyed, the railguns can then be targeted and destroyed to complete the objective.
STONEHENGE RETURNS III
As with STONEHENGE RETURNS I and II, players start off at south-east of Stonehenge and must first destroy the four groups of three ECM jammer towers surounding the railguns. They will be under attack by Stonehenge Gold Ring's railguns, whose firing rate is even greater than that of the other two variants. A group of T-50 PAK-FA will appear in place of the MiG-31 Foxhound as reinforcement, followed by three P-1113 Kottos aerial warships providing further jamming before the three ECM jammers towers inside Stonehenge can be targeted. Once the jammers are destroyed, the railguns can then be targeted and destroyed to complete the objective.
STONEHENGE RETURNS IV
Players spawn at the southeast corner of the map. Stonehenge is located roughly in the center of the map, and will immediately commence firing on all players. All eight railguns are active, and Stonehenge's fire now blankets the sky at all altitudes within the damage range, forcing players to avoid the blast radius completely. Radar jamming facilities consisting of three radar towers defended by multiple AA guns and SAMs are set up in four locations, one on each corner of the map. The players' first objective is to destroy the radar towers to clear the jamming. Soon afterward, three Kottos-class aerial warships will spawn above Stonehenge, jamming the radar. Players must shoot all three of them down, by first destroying their jammer arrays, then their engines, and finally their cockpits. After all three Kottos are shot down, one of Camilla's QFA-44 Carmillas will appear alongside innumerable MQ-90Ls. Her QFA-44 is the only important target here, and must be shot down to continue the mission. After the QFA-44 is shot down, the three jamming towers in the middle of Stonehenge can be damaged. All three towers must be destroyed to continue with the mission. Finally, players must destroy all eight Stonehenge railguns to complete the mission.
| Progress | 100% complete |
| Tags |
1 Update Logs
Update #1 : by PrimoSuperT 01/05/2015 12:12:01 amJan 5th, 2015
"All units, priority level for the operation has changed. We now have an emergency mission."
― AWACS Sky-Eye
*New Stonehenge Variants Online
>>STONEHENGE RETURNS I
>>STONEHENGE RETURNS II
>>STONEHENGE RETURNS III
-P-1113 Kottos Aerial Warship has appeared.
>>STONEHENGE RETURNS IV
-Butterfly Master "Camilla" has appeared.
-QFA-44 Carmilla (1x)
-MQ-90L Quox (6x)
-P-1113 Kottos Aerial Warship has appeared.
3177410
2

![ODIN (Orbital Defense Initiative) Space Station [Call of Duty: Ghosts] Minecraft Map & Project](https://static.planetminecraft.com/files/resource_media/screenshot/1528/image9115271_thumb.jpg)
![Strategic Orbital Linear Gun [SOLG] [1:2 Scale] Minecraft Map & Project](https://static.planetminecraft.com/files/resource_media/screenshot/1512/strategicorbitallineargun1-2scalecoverfinal8747427_thumb.jpg)
![Hiei [Kantai Collection] Minecraft Map & Project](https://static.planetminecraft.com/files/resource_media/screenshot/1512/hieikantaicollectioncover8743572_thumb.jpg)
![Kirishima [Kantai Collection] Minecraft Map & Project](https://static.planetminecraft.com/files/resource_media/screenshot/1512/kirishimakantaicollectioncover8741226_thumb.jpg)


![Kitchen - [Download]](https://static.planetminecraft.com/files/resource_media/screenshot/1621/small/0d2cxqp10185895_thumb.jpg)
 shackfu
 DoomStryker
 TheAxolotlLord
 Night Cheetah
 KrAzY DuDe LR
 JorgeTKP
 ApparentlySkilled

 Mailgusang
 MazaVili
 MarkSarmite
 BlocksMc
 IJCraft Builds
Create an account or sign in to comment.
I nearly got a S rank in Far Eastern Front with my Lvl 4 A10, I just happened to fire my Sidewinders a little too early when she pulled off a HIgh G turn and the time limit finished.
I'm looking forward to it!
I do agree that her voice actress is cute.
As for Mission 5, I actually engaged her and her butterflies using the ADFX-01 Morgan (since the Quox UAVs can shoot down everyone's missiles). During my first try, I was able to Take her down before Gamer ended the countdown.
I did the same thing for Area B7R (I just unlcoked today). Although I got slaugtered both on the Rental and the Morgan, I did manage to take out about 3 UAVs and bring her down to 75% in one shot. Still failed the misison after 1.5 hours, 2 stocked and 20K+ creds
I hope they make the plane playable in Future Prospect
Also, I just bought the campaign; I didn't mind spending the $20.
I really do hope that Project Aces brings in the CFA-44 Nosferatu. If they also bring in the ADMM...then a lot of people will be screwed...